
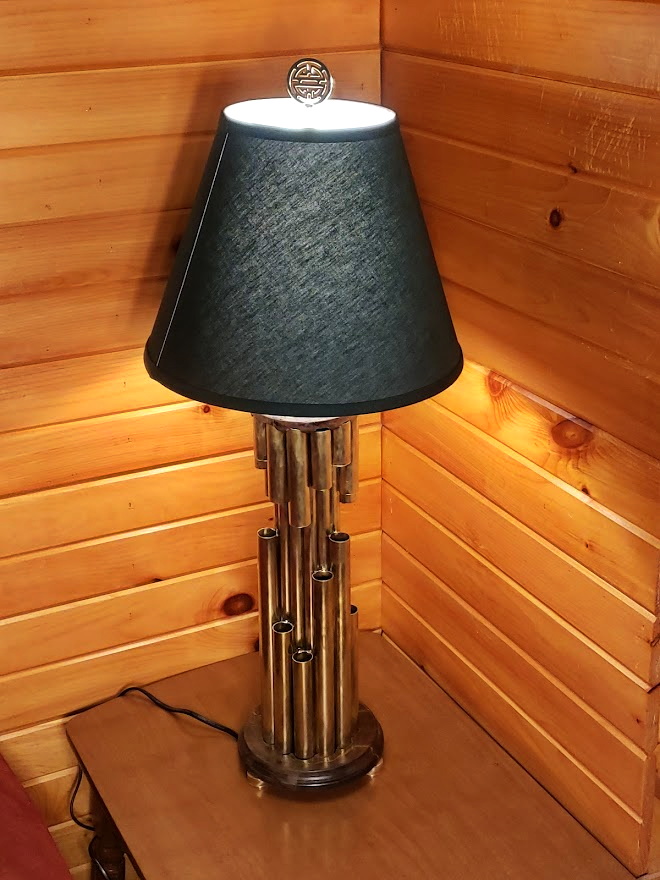
Art Deco Lamp

Another project inspired by Cowboy Bebop, this one an art-deco lamp glimpsed in the background. This time, I didn’t try to replicate the original, I just took inspiration from that glimpse and started brainstorming. Brainstorming turned into cad, and turned into an excuse to practice my cad. Which turned into an excuse to do trig, build spreadsheets of pipe lengths, and completely overthink the whole design. That’s going to be a recurring theme here – excuses to practice skills, try new techniques, and vastly try-hard the whole build. Because it’s fun.

CAD completed, I ordered some brass pipe from Online metals, and chopped it to size. I used the CAD to CNC some internal and external spacers (thank goodness the shopbot will let you scale files, I ended up needing to run at 102.5% for a snug but not impossible fit), and then used those spacers to hold the pipes in place while I affixed them. The first attempt was soldering, but that was a complete failure. So I TIG’d the whole thing, mostly because I needed practice tigging. It turned out needing a lot of cleanup, so if I were to do it again, I’d build it in two halves, left and right. I’d tig the tops and bottoms which are hidden in the bases, but I’d rivet the centers in from the inside. TBH, it could be done entirely with rivets, and you’d maintain the polished surface finish.

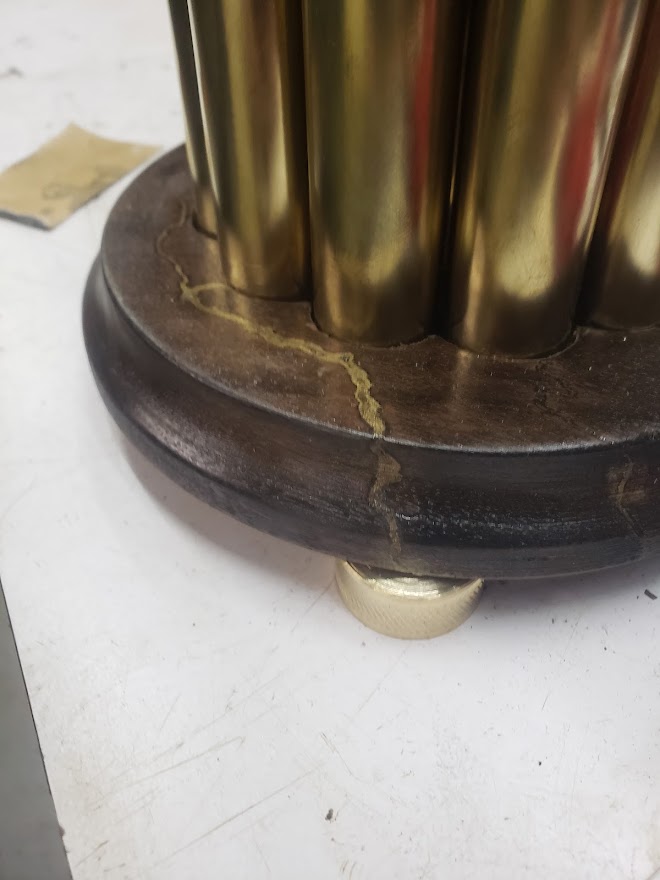
For the top and the bottom I used walnut, CNC’d the pockets in place to hold the ends of the tubes, and then turned them on the lathe. I could have done the shaping on the CNC, but (as you probably guessed) I wanted practice turning on the lathe. Once I had them shaped, I set about adding detail. I love the marbled look, but didn’t want to actually do marble, so I set about recreating the look with Lichtenburg burning. All the references recommend using Baking Soda dissolved in water to add conductivity to the surface, but looking around the shop we didn’t have any. Second choice was salt, but again absent in the shop. Looking around, desperate for ions, I found some borax – which actually worked beautifully. Using a 10kv high-voltage tester, I painted the dissolved borax solution onto the wood, then burned paths while blowing air with the compressor. The airflow deepened the burn patterns, which gave me more room to add bronze. Instead of telling you about inlaying bronze, I will instead link to Blanch Woodworking who has done all the experimenting, and who’s techniques I followed. TLDR: Superglue, brass powder, sand, repeat, repeat.
 |
 |
 |
After some stain and a lot of polyurethane, it was on to the feet. Again, this was just an excuse to play on the lathe, this time with machine tools instead of chisels. Knurling, pocketing, drilling, and parting.

After that, it was a pretty simple assembly. A top plate from SCS, a bunch of lamp parts (quite reasonably priced from Grand Brass Lamp Parts), an expensive shade from wayfair, and it’s done!

You must log in to post a comment.